GRAMPS Manual V2.0
This manual describes version 0.9.1 of GRAMPS.Copyright © 2003 Alex Roitman
Copyright © 2001 Donald N. Allingham
| Revision History | ||
|---|---|---|
| Revision GRAMPS Manual V2.0 | March 2003 | |
| Revision GRAMPS User Manual V1.1 | 2001 | |
| Revision gramps User Manual V1.0 | 2001 | |
- Table of Contents
- 1. Introduction
- 1.1. Why GRAMPS?
- 2. Getting Started
- 3. Main Window
- 3.1. Views
- 3.1.1. Switching Views and Viewing Modes
- 3.1.2. People View
- 3.1.3. Family View
- 3.1.4. Pedigree View
- 3.1.5. Sources View
- 3.1.6. Places View
- 3.1.7. Media View
- 4. Usage
- 4.1. Opening Database
- 4.2. Starting New Database
- 4.3. Saving Database
- 4.4. Importing GEDCOM Data
- 4.5. Exporting GEDCOM Data
- 4.6. Importing and Exporting GRAMPS Packages
- 4.7. Editing Data: Quick Start
- 4.7.1. To Add a Person
- 4.7.2. To Specify a Relationship
- 4.7.3. To Specify Parents
- 4.7.4. To Specify Children
- 4.7.5. To Add Images
- 4.7.6. To Edit Sources and Places
- 4.8. Editing Data: Complete Description
- 4.8.1. Edit Personal Information
- 4.8.2. Edit Relationship Data
- 4.8.3. Edit Source Data
- 4.8.4. Edit Place Data
- 4.8.5. Edit Media Data
- 4.8.6. Edit Events
- 4.8.7. Edit Source Information
- 4.8.8. Edit Alternate Names
- 4.8.9. Edit Attributes
- 4.8.10. Edit Addresses
- 4.8.11. Edit Witnesses
- 4.9. Navigation
- 4.9.1. Setting Default Person
- 4.9.2. Bookmarking People
- 4.9.3. Using Family View
- 4.9.4. Using Pedigree View
- 4.10. Generating Reports
- 4.11. Running Tools
- 5. Settings
- 5.1. Usage
- 5.1.1. Find
- 5.1.2. Report Preferences
- 5.1.3. Researcher Information
- 5.1.4. Data Guessing
- 5.2. Display
- 5.2.1. General
- 5.2.2. Dates and Calendar
- 5.2.3. Tool and Status Bars
- 5.3. Database
- 5.3.1. General
- 5.3.2. Media Objects
- 5.3.3. GRAMPS internal IDs
- 5.3.4. Revision Control
- 6. About GRAMPS
1. Introduction
The GRAMPS is a genealogical application. GRAMPS is an acronym for the Genealogical Research and Analysis Management Programming System. To put it shortly, it allows you to store, edit, and research genealogical data using your computer. Its functionality is somewhat common to other genealogical programs. However, GRAMPS offers some unique features.
1.1. Why GRAMPS?
GRAMPS was conceived under the concept that most genealogy programs were designed to provide the researcher the capability to input information related to a particular family tree. Most of these programs have allowed for the arranging and storing of information consistent with the GEDCOM standards. They usually provide means for displaying descendant or ancestral relationships by means of graphical displays, charts, or reports. These may be augmented with pictures or other media to enhance the data. Most provide for inputting data on unconnected individuals/families that may or may not have a relationship to the primary surname being researched. Various other enhancements may also be provided in the genealogical program that allows for different degrees of importing and exporting data from other programs and printing the data contained in the various reports.
GRAMPS, on the other hand, attempts to provide all of the common capabilities of these programs, but, more importantly, to provide an additional capability of integration not common to these programs. This is the ability to input any bits and pieces of information directly into GRAMPS and rearrange/manipulate any/all data events in the entire data base (in any order or sequence) to assist the user in doing research, analysis and correlation with the potential of filling relationship gaps. In short, a tool that provides a way to input all your research into one place and do your analysis and correlation using the speed, power, and accuracy of your computer instead of pencils and unmanageable reams of paper.
2. Getting Started
2.1. To Start GRAMPS
You can start GRAMPS in the following ways:
- menu
Choose ->.
- Command line
To start GRAMPS from a command line, type gramps, then press Return.
If you would like GRAMPS to open a specific database or to import a specific file on startup, you can supply the filename as a command line argument:
gramps filename.ged
where filename.ged is the name of the file you want to open/import.
2.2. Running GRAMPS for the first time
The first time you run the program, GRAMPS will display its Getting Started screens.

2.2.1. Choosing a database on startup
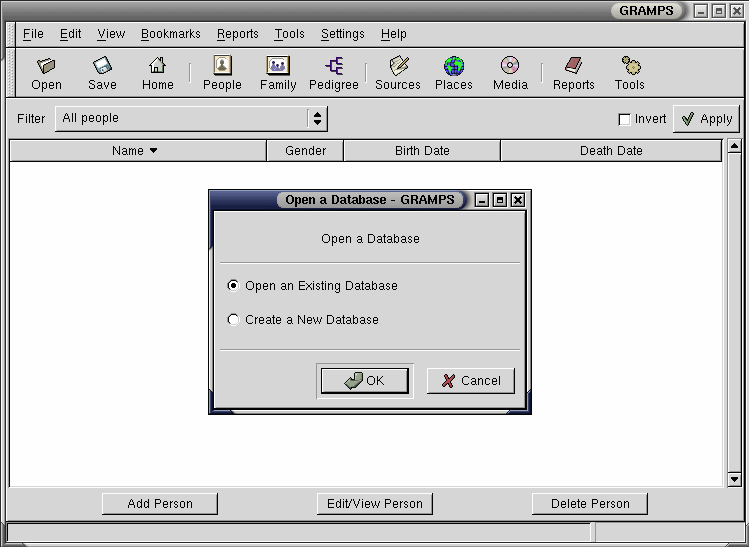
If GRAMPS is started without any database to open, the following window will appear prompting you to choose what database to open.

If you would like to open an existing database, check the top radio button and click . You will then be asked to specify the name of your existing database. If you would like to start creating your brand new database from scratch right away, choose new XML database.
2.2.2. Optional ZODB support
If either StandaloneZODB or Zope is installed on your system, GRAMPS will give you the third option of creating a new ZODB database. You can choose to start your new database in either XML or ZODB format. Both formats have their strong and weak points.
XML stands for eXtensible Markup Language, and is a human readable structured description of data. It could be easily parsed by other programs should the need occur. It stores only the data itself. Its weak point is the relatively low speed of processing large data files.
ZODB stands for Zope Object Database and provides the full-fledged database support. ZODB files are not human readable. They contain a certain overhead to assist working with large data structures. However, ZODB provides a significant speed-up when the database size is large (over few thousand people).
Its is hard to tell which format is better, since this is a typical tradeoff situation. If you are starting your research then you are likely to be fine with the regular XML database. If you have tons of data to import describing thousands upon thousands of people, then you are probably better of with ZODB.
3. Main Window
When you open a database (either existing or brand new), the following window is displayed.
The GRAMPS window contains the following elements:
- Menubar.
The menubar provides access to all features of GRAMPS through its menus.
- Toolbar.
The toolbar provides access to the most frequently used functions of GRAMPS. The appearance of the toolbar can be adjusted in Preferences dialog.
- Progress bar.
The progress bar is located in the lower left corner of the GRAMPS window. It displays the progress of time consuming operations, such as opening and saving large data bases, importing and exporting to other formats, generating web-sites, etc.
- Statusbar.
The statusbar is located to the right of the progress bar, on the very bottom of the GRAMPS window. It displays information about current GRAMPS activity and contextual information about the menu items. The behavior of the Status line can be adjusted in Preferences dialog.
- Display area.
The largest are in the center of the GRAMPS window is the display area. It shows certain aspects of genealogical information, depending on the currently selected View. There are six Views available in GRAMPS: Section 3.1.2, Section 3.1.3, Section 3.1.4, Section 3.1.5, Section 3.1.6, and Section 3.1.7.
3.1. Views
Views are the various ways to display different aspects of genealogical information, as described below. Since the relevant information is very broad and non-uniform in both context and modality, it is best to split it's display into smaller categories, uniform in context and modality. Each View represents such a split and displays a certain portion of overall available information. Before the detailed description of available Views, let us guide you through the ways of switching between the Views.
3.1.1. Switching Views and Viewing Modes
Depending on the state of the -> menu item, the View could be switched either in the sidebar or in the notebook tabs in the top part of the window.
- To switch the View while in a Sidebar mode, click on the desired sidebar icon.
- To switch the View while in a Notebook mode, click on the desired notebook tab.


To switch between sidebar and notebook viewing modes, choose -> from the GRAMPS menu.
3.1.2. People View
When GRAMPS opens a database, the View is set to the People View. People View lists individuals whose data is stored in the database. People View displays people's Names, GRAMPS ID numbers, Gender, and their Birth and Death dates. The list can be ordered by any field.
Example: to order list by the Birth date, click on the Birth date column heading. To order list in reverse (descending) order, click one more time on the desired column heading.
3.1.2.1. Filters
Genealogical databases may contain huge numbers of people. Since the long lists are hard for humans to handle, GRAMPS provides a convenient way to limit the scope of browsing by using the Filter. To save screen space, Filter controls may be hidden, depending on the state of -> menu item.

When GRAMPS opens a database, the Filter is set to the trivial filter called All people, i.e. no filtering is in effect. To choose a filter, use a pop-up Filter menu above the people's list. Once the Filter is chosen, click in the upper right corner of the window. The filtering will take effect upon clicking . To invert the filtering rule, check the Invert box on the left of button.
Example: To show people without children, choose People with children filter, then check Invert box, and then click . To cancel any filtering, set the filter to All people and then click .
Note: even if the Filter controls are not displayed (-> menu item is unchecked), the filtering might still be in place. In other words, the visibility of the Filter controls is not related to the actual filtering imposed on the list. This may be a cause of confusion, when you enable the filtering and then remove the controls from the display. If in doubt, enable the display of Filter controls by checking -> menu item and check what kind of filtering is currently set.
3.1.2.2. Alphabetical Tabs
GRAMPS offers another way of managing long lists of people -- alphabetical tabs. Upon loading a database, GRAMPS checks for the stored Family names and breaks the people list into sublists based on the first letter of their name. The alphabetical tabs are displayed in the bottom part of the GRAMPS window. The last tab, Other, stands for unidentified characters -- all the entries not assigned to any other tab end up in Other. In particular, people with no family name will appear under this category.
3.1.3. Family View
Family View displays the Family information of a currently selected (or Active) person. Specifically, this view shows the relationships (e.g marriages, partnerships, etc.) of the active person, his/her parents (or step parents, or guardians, etc), and his/her children (could be step children, adopted children, etc.).

The Active person's data is in the list-box in the upper left corner of the window. Directly below it, another box lists the Spouse's data, for each relationship of Active person (can be more than one). The double-arrow button to the right of the Active person list-box allows to exchange the currently selected spouse (Current spouse) with the Active person. Double-clicking on the Active person allows to edit Active person's data. Double-clicking on the Current spouse allows to edit their relationship information. To add a spouse, click to the right of the spouse box. To remove Current spouse, click to the right of the spouse box.
The parents of both the Active person and the Current spouse are listed in the corresponding list-boxes in the right-hand part of the window (Active person's parents on top, Current spouse parents on the bottom). Both list-boxes have a set of three buttons on their right side. The and buttons allow to add and remove parents of the Active person and the Current spouse, respectively. Clicking makes the family in the corresponding list-box and active family. That is, it makes the selected Father the Active person, and the selected Mother the Current spouse.
The bottom list-box displays children of the Active person and the Current Spouse. Children's list can be order by the Birth date, by usual way of clicking on the Birth date column header. In addition to the Name, ID, Gender, and Birth date columns, the list includes Status column. The pair of status words reflect the relationship between the child and his Father/Mother (such as Birth, Adoption, etc.) The three buttons are available on the right side of the children list-box. The and buttons allow to add and remove children, respectively. Clicking makes the selected child the Active person.
3.1.4. Pedigree View
Pedigree View helps to visualize the place of the Active person in the tree of its ancestors. Pedigree View shows four generations, going back in time from the Active person 1 to his/her parents 1, to grandparents 1, to great-grandparents 1. Each person is denoted by a white box bearing the person's name. The two lines that converge on the box represent ties with the person's Father (top line) and mother (bottom line). Solid lines represent birth relations, while dashed lines represent non-birth relations (such as adoption, step-parentship, guardianship, etc.). When the mouse moves over the white box, it expands to display the corresponding person's dates of birth and death. When the mouse is placed over the family line, the line changes color to indicate an active link: double-clicking on the line makes the corresponding ancestor the Active person. The display in that case is re-adjusted to show four generations, starting from a newly selected Active person.
The left-hand side of the window shows the left arrow button. Upon clicking, the button expands to the menu listing the children of the Active person. Selecting the menu item makes the corresponding child the Active person.
The right-hand side of the window shows two right arrow buttons. When the top button is clicked, the Father of the Active person becomes Active person. Clicking the bottom button makes the Mother of the Active person the Active person. Again, the display is re-adjusted to show four generations, starting from a newly selected Active person.
3.1.5. Sources View
Sources View lists the sources of information stored in the database. This can include various documents (birth, death, and marriage certificates, etc.), books, films, journals, private diaries, i.e. virtually anything that can be classified as a source of information. The sources can be used as the reference for any event stored in the database. The Source View lists the Title, ID, and the Author of the source. All the columns can be used for sorting the list. The usual rules apply: one click for ascending order, another click for descending order.
3.1.6. Places View
Places View lists the geographical places in which the events of the database took place. These could be places of birth, death, marriages of people, as well as their home, employment, education addresses, or any other conceivable reference to the geographical location. The Places View lists places' Name, ID, Church Parish, City, County, State, and Country. All of these can be used for sorting by the usual sorting rules.
3.1.7. Media View
Media View is a list of Media Objects used in the database. Media Objects are any files that relate somehow to the stored genealogical data. Technically, any file can be stored as a Media Object. Most frequently, these are images, audio files, animation files, etc. The list-box on the bottom lists the Name, ID, Type, and Path to the Media Object. The top part of the GRAMPS window shows the preview (if available) and the information about the Media Object.
4. Usage
As commonly encountered in everyday life, in GRAMPS there is usually more than one way to accomplish something. The alternatives to some actions will therefore be listed as appropriate.
4.1. Opening Database
To open a database, either choose -> or click button on the Toolbar. The Open Database dialog will appear. Either type the full path into the Database text entry field, or click to get the Open File dialog in which you can select the file that you want to open. After you have selected the file, click to open it.
If you have previously opened files with GRAMPS you can retrieve your past selections from the drop-down menu by clicking the down arrow button. Finally, if the Revision Control System (RCS) is enabled in the Preferences dialog, the check-box Revert to an older version from RCS will be available. Check it to revert your database to an older RCS version.
Note: the name you type or select should be the directory (folder) which has your data (data.gramps or data.zodb files) as well as any possible copies of Media Objects.
4.2. Starting New Database
To start a new database, choose ->. You will then be prompted with the Save Database dialog asking to specify the name under which the new database will be stored. Choose an empty directory for your new database (create one if necessary).
4.3. Saving Database
To save changes made to your database, choose -> or click on the Toolbar. The Status line will then display Saving filename... message, and the progress bar will advance as the saving progresses.
4.4. Importing GEDCOM Data
Importing GEDCOM data allows you to incorporate the data created in other genealogical programs into your currently open GRAMPS database. GRAMPS can import GEDCOM data files from a number of software packages, as long as they comply with GEDCOM standards. To import GEDCOM file, choose ->->. You will then be prompted with the Open File dialog asking to specify the GEDCOM file name.
Upon starting the import, GRAMPS will display the following GEDCOM import dialog with the summary of the information about the data. The information is updated as the import progresses.

4.5. Exporting GEDCOM Data
Exporting GEDCOM data allows you to share any portion of you GRAMPS database with other researchers by way of standard GEDCOM files. To export into GEDCOM file, choose ->->. The following Export GEDCOM file dialog will appear.

Type the desired GEDCOM filename into the text entry box or click to evoke Save File dialog. Use Filter pop-up menu to limit the scope of export according to the stated rule. Choose the desired Encoding of the exported file. Use Target to select the desired GEDCOM dialect. Select you copyright statement from the Copyright menu. Check Do not include records marked private to disable the output of private records. Check Restrict data on living people to limit living people's data to family ties. With this option, information concerning birth, death, addresses, various events, etc. will be omitted in the exported GEDCOM file.
Upon starting the export, GRAMPS will display the following GEDCOM export progress window with the progress bars reflecting the current state of exporting.

4.6. Importing and Exporting GRAMPS Packages
GRAMPS provides a way to make your GRAMPS database completely portable. This might prove useful, for instance, when you need to move your database to another machine or to share it with somebody, while retaining all the features provided by GRAMPS. To accomplish this, choose ->->. The GRAMPS Package Export window will appear. Type the desired package name into the text entry area or click to select the file using the Save File dialog. The resulting package is gzip-compressed tar archive (also known as tarball) which contains gramps database, all local media objects, and copies of all external media objects.
To import data from such a package into your GRAMPS database, choose ->->, then select a package to be imported from the Import from GRAMPS dialog.
4.7. Editing Data: Quick Start
Editing any portion of data allows you to amend and/or modify information stored in the database. The available editing options include editing personal data, relationship data, data about children and parents, information about sources, places, and media objects used in the database. In short, any data stored in the database can be edited! Adding new pieces of information is in fact creating an appropriate empty data structure and subsequent editing of that empty structure.
4.7.1. To Add a Person
To add a person to the database, switch to the People View (Section 3.1.1) and then click on the toolbar. Enter any data you know about this person into the Edit Person Dialog (see Section 4.8.1 for details). To edit information about a person already present in the database, select an entry you would like to view/modify, and then click on the toolbar.
4.7.2. To Specify a Relationship
To specify a relationship, first switch to the Family View (Section 3.1.1). Then click button on the right of the spouse box. Select a spouse/partner from the list and specify their relationship using the menu at the bottom. If necessary, you can add a person to the list by clicking button. To edit information about relationship already present in the database, move the mouse over Spouse box and double-click.
4.7.3. To Specify Parents
To specify parents of an active person, first switch to the Family View (Section 3.1.1). Then click button on the right of the active person's parents list-box. Select the parents from two lists and specify the parents' relationships to the active person using menus at the bottom. You can also specify parents' relationship to each other. If necessary, you can add a person to the list by clicking button.
The top and bottom lists contain males and females, respectively. By default, GRAMPS will limit both lists to people who could possibly be the parents (judged by the date of birth) of the active person. To override this, check the Show all box for each list.
To specify parents of the active person's spouse, switch to the Family View and then click button on the right of the spouse's parents list-box. To edit information about parents already present in the database, move the mouse over the corresponding parents' box and double-click.
4.7.4. To Specify Children
To specify children of an active person, switch to the Family View (Section 3.1.1) and then click button on the right of the children list-box. Select a child from the list and specify child's relationship with father and mother using menus at the bottom. If necessary, you can add a person to the list by clicking button.
By default, GRAMPS will limit the list lists to people who could possibly be the child (judged by the date of birth) of the active person. To override this, check the Show all box.
4.7.5. To Add Images
You can add images (as well as other media objects) to individual people, events, sources, places, as well as images generally related to the database (e.g. group family photos).
To add images related to a single person, switch to the People View (Section 3.1.1), select a person, and then click on the toolbar to invoke the Edit Person Dialog (Section 4.8.1). Then, select the Gallery tab, and click to invoke Select a media object dialog. Type filename or select a file with the image, then provide a title for that image. To prevent the file from being copied into your database directory, check the Do not make a local copy box. Keep adding images until you are done.
To add images related to a relationship (e.g. marriage), switch to the Family View (Section 3.1.1) and then double click on the Spouse box invoke Marriage/Relationship editor dialog. Select the Gallery tab and click to add an image.
To add images related to a source or a place, first switch to the Sources View or Places View, respectively (Section 3.1.1). Then select the appropriate source or place and then either double click on it or click on the toolbar to invoke Source Editor (or Place Editor) dialog. Select the Gallery tab and click to add an image.
Finally, to add images that are generally related to the database but not limited to any person, relationship, source, or place in particular, switch to the Media View (Section 3.1.1). Then click on the toolbar to add an image. If you have already added any images to any individual galleries, you will also find the listed in the Media View.
In any gallery, you can also use and buttons to edit image information and to remove the image reference from that gallery. Note that in all galleries removing the reference to the image does not remove the image from the database. To completely remove the image from the database, delete it from Media View by first selecting it and then clicking on the toolbar.
4.7.6. To Edit Sources and Places
To add a source or a place to the database, switch to the appropriate Sources or Places View (Section 3.1.1). Then click on the toolbar to add a source/place. Enter the information into the Source Editor (or Place Editor) dialog.
To edit information about sources and places already present in the database, switch to the appropriate view, select an entry you would like to view/modify, and then click on the toolbar.
4.8. Editing Data: Complete Description
4.8.1. Edit Personal Information
Editing of personal data can be performed in the following ways.
- From People View:
Double-click the name of the person whose data you would like to edit, or select the name by single click and then click on the toolbar.
- From Family View:
Move the mouse into the Active person box, then double-click.
With either method, the following Edit Person dialog will appear:

The top of the window shows the name of the person whose data is being edited. The main part of the window displays nine notebook tabs containing different categories of available information. You can bring any tab to the top for viewing or editing by clicking on the appropriate tab heading. The bottom part has and buttons. Clicking at any time will apply all the changes made in all tabs and close the dialog window. Clicking at any time will close the window without applying any changes. If any of the data in any tab was modified, the alert window will appear with the choices of closing the dialog without saving changes, canceling the initial cancel request, or saving the changes.
The tabs provide the following information categories of personal data:
- General
General tab allows editing of the most general information about the person. This includes text entry fields of Given name, Family name, Family prefix (such as de or van), Suffix (e.g. Jr. or III), Title (e.g. Dr. or Rev.), Nickname (Bob for Robert), Type of the name (birth name, married name, etc.) and Date and Place of birth and death. Some of these (Family name, Type, and both Place fields), in addition to typing the data in, allow to choose the corresponding contents from the drop-down menus by clicking on a down-arrow button located immediately to the right of the text entry field. The available menu choices are formed from the information already stored in the database. Also, when you start to type within these fields, GRAMPS will try to guess the remainder of the text by using the same choices that are available from the corresponding menu. To accept the highlighted guess and move to the next field, press Tab.
The Gender radio buttons offers the choice of person's gender between male, female, and unknown. The buttons and allow to add or modify the data about the sources of the name information and any notes relevant to it. Similarly, clicking buttons located by the birth and death Date fields allows to edit the corresponding events of birth and death. The field ID displays internal GRAMPS ID number which identifies user in the database. Finally, the Image area shows the first image available in the Gallery of this person.
- Names
Names tab displays information concerning alternate names of the person and the controls allowing its modification. The bottom part displays the list of all alternate names of the person stored in the database. The top part shows the details of the currently selected name in the list (if any). The buttons , , and allow to correspondingly add, modify, and remove an alternate name record from the database. Note that and buttons become available only when an alternate name is selected from the list.
- Events
Events tab displays information about the events relevant to the person and the controls allowing its modification. The bottom part displays the list of all such events stored in the database. The top part shows the details of the currently selected event in the list (if any). The buttons , , and allow to correspondingly add, modify, and remove an event record from the database. Note that and buttons become available only when an event is selected from the list.
- Attributes
Attributes tab displays information about the attributes of the person and the controls allowing its modification. These could be any personal attributes of a person whose description naturally fits into Parameter-Value pairs (e.g. enormous generosity can be stored as the parameter "Generosity" with the value "Enormous", etc.). The bottom part displays the list of all attributes stored in the database. The top part shows the details of the currently selected attribute in the list (if any). The buttons , , and allow to correspondingly add, modify, and remove an attribute record from the database. Note that and buttons become available only when an attribute is selected from the list.
- Addresses
Addresses tab displays information about the addresses of the person and the controls allowing its modification. The bottom part displays the list of all addresses stored in the database. The top part shows the details of the currently selected address in the list (if any). The buttons , , and allow to correspondingly add, modify, and remove an address record from the database. Note that and buttons become available only when an address is selected from the list.
- Notes
Notes tab displays information about the notes concerning the person. These could be any notes which do not naturally fit into the Parameter-Value pairs available to Attributes. To add a note or modify existing notes simply edit the text in the text entry field.
- Gallery
Gallery tab displays information about media objects associated with the person and the controls allowing its modification. The central part shows the list of all such media objects. For media object which are valid image files previews of images are displayed. For other objects such as audio files, movie files, etc. generic GRAMPS icon is displayed instead. Note that the first available image in the gallery will be also displayed in the Image area in the General tab. The buttons , , and allow to correspondingly add, modify, and remove a media object reference to this person. Note that and buttons become available only when a media object is selected from the list.
- Internet
Internet tab displays information about Internet addresses relevant to the person and the controls allowing its modification. The bottom part displays the list of all such Internet addresses stored in the database. The top part shows the details of the currently selected addresses in the list (if any). The buttons , , and allow to correspondingly add, modify, and remove an Internet address record from the database. The button allows to open a web-page with the corresponding address with your default browser. Note that , , and buttons become available only when an address is selected from the list.
- LDS
LDS tab displays information about LDS ordinances of the person and the controls allowing its modification. These are LDS baptism, Endowment, and Sealed to parents ordinances, as labeled inside the tab. Each ordinance is described by its date, LDS temple, and Place where it happened. An additional pop-up menu Parents is available for the Sealed to parents ordinance. Each ordinance can further be described by its status through the selections available in the Status pop-up menu and can also be referenced by sources and notes via corresponding and buttons.
4.8.2. Edit Relationship Data
Editing of relationship data is performed in the following Marriage/Relationship Editor dialog which appears after double-clicking on the spouse box in the Family View.

The top of the window shows the names of the people whose relationship is being edited. The main part of the window displays six notebook tabs containing different categories of available information. You can bring any tab to the top for viewing or editing by clicking on the appropriate tab heading. The bottom part has and buttons. Clicking at any time will apply all the changes made in all tabs and close the dialog window. Clicking at any time will close the window without applying any changes. If any of the data in any tab was modified, the alert window will appear with the choices of closing the dialog without saving changes, canceling the initial cancel request, or saving the changes.
The tabs provide the following information categories of relationship data:
- General
General tab allows editing of the most general information about the relationship: the relationship type. The available types (such as married, partners, etc.) can be chosen from the drop-down Relationship type menu. The non-editable field ID displays internal GRAMPS ID number which identifies this relationship in the database.
- Events
Events tab displays information about the events relevant to the relationship and the controls allowing its modification. The bottom part displays the list of all such events stored in the database. The top part shows the details of the currently selected event in the list (if any). The buttons , , and allow to correspondingly add, modify, and remove an event record from the database. Note that and buttons become available only when an event is selected from the list.
- Attributes
Attributes tab displays information about the attributes of the relationship and the controls allowing its modification. The bottom part displays the list of all such attributes stored in the database. The top part shows the details of the currently selected attribute in the list (if any). The buttons , , and allow to correspondingly add, modify, and remove an attribute record from the database. Note that and buttons become available only when an attribute is selected from the list.
- Notes
Notes tab displays information about the notes concerning the relationship. These could be any notes which do not naturally fit into the Parameter-Value pairs available to Attributes. To add a note or modify existing notes simply edit the text in the text entry field.
- Gallery
Gallery tab displays information about media objects associated with the person and the controls allowing its modification. The central part shows the list of all such media objects. For media object which are valid image files previews of images are displayed. For other objects such as audio files, movie files, etc. generic GRAMPS icon is displayed instead. The buttons , , and allow to correspondingly add, modify, and remove a media object reference to this relationship. Note that and buttons become available only when a media object is selected from the list.
- LDS
LDS tab displays information about LDS Sealed to spouse ordinance of the person and the controls allowing its modification. The data can include date, LDS temple, and Place where it happened. The ordinance can further be described by its status through the selections available in the Status pop-up menu and can also be referenced by sources and notes via corresponding and buttons.
4.8.3. Edit Source Data
To edit source data, switch to the Sources View and select the desired entry in the list of sources. Double-click on that entry or click on the toolbar to invoke the following Source Editor dialog:

The top of the window shows the Source Editor title of the dialog. The main part of the window displays four notebook tabs containing different categories of available information. You can bring any tab to the top for viewing or editing by clicking on the appropriate tab heading. The bottom part has and buttons. Clicking at any time will apply all the changes made in all tabs and close the dialog window. Clicking at any time will close the window without applying any changes. If any of the data in any tab was modified, the alert window will appear with the choices of closing the dialog without saving changes, canceling the initial cancel request, or saving the changes.
The tabs provide the following information categories of source data:
- General
General tab allows editing of the most general information about the source: its title, author, and publication information. This information can be typed in the appropriate text entry fields.
- Note
Note tab displays any notes concerning the source. To add a note or modify existing notes simply edit the text in the text entry field.
- Gallery
Gallery tab displays information about media objects associated with the given source and the controls allowing its modification. The central part shows the list of all such media objects. For media object which are valid image files previews of images are displayed. For other objects such as audio files, movie files, etc., generic GRAMPS icon is displayed instead. The buttons , , and allow to correspondingly add, modify, and remove a media object reference to this source. Note that and buttons become available only when a media object is selected from the list.
- References
References tab displays information about database records that refer to this source. If the source is not referenced from any database record, the tab shows empty list. If the source is referenced from many records, the tab will list all of them. The list can be ordered by any of its column headers: Source type, Object, or Value. This information cannot be modified from the Source Editor dialog. Instead, the corresponding database record (e.g. birth event) has to be brought up and its source reference edited.
4.8.4. Edit Place Data
To edit place data, switch to the Places View and select the desired entry in the list of places. Double-click on that entry or click on the toolbar to invoke the following Place Editor dialog:

The top of the window shows the Place Editor title of the dialog. The main part of the window displays seven notebook tabs containing different categories of available information. You can bring any tab to the top for viewing or editing by clicking on the appropriate tab heading. The bottom part has and buttons. Clicking at any time will apply all the changes made in all tabs and close the dialog window. Clicking at any time will close the window without applying any changes. If any of the data in any tab was modified, the alert window will appear with the choices of closing the dialog without saving changes, canceling the initial cancel request, or saving the changes.
The tabs provide the following information categories of place data:
- General
General tab allows editing of the most general information about the place: title which labels it in the database, city, church parish, county, state, country, longitude, and latitude. This information can be typed in the appropriate text entry fields.
- Other names
Other names tab displays information concerning other names by which the place might be known and the controls allowing its modification. The bottom part displays the list of all other names of the place stored in the database. The top part shows the details of the currently selected name in the list (if any). The buttons , , and allow to correspondingly add, modify, and remove a name record from the database. Note that and buttons become available only when a name is selected from the list.
- Note
Note tab displays any notes concerning the place. To add a note or modify existing notes simply edit the text in the text entry field.
- Sources
Sources tab displays information about sources relevant to this place and the controls allowing its modification. The central part displays the list of all such sources references stored in the database. The buttons , , and allow to correspondingly add, modify, and remove a source reference to this place. Note that and buttons become available only when a source reference is selected from the list.
- Gallery
Gallery tab displays information about media objects associated with the given place and the controls allowing its modification. The central part shows the list of all such media objects. For media object which are valid image files previews of images are displayed. For other objects such as audio files, movie files, etc., generic GRAMPS icon is displayed instead. The buttons , , and allow to correspondingly add, modify, and remove a media object reference to this source. Note that and buttons become available only when a media object is selected from the list.
- Internet
Internet tab displays information about Internet addresses relevant to the place and the controls allowing its modification. The bottom part displays the list of all such Internet addresses stored in the database. The top part shows the details of the currently selected addresses in the list (if any). The buttons , , and allow to correspondingly add, modify, and remove an Internet address record from the database. The button allows to open a web-page with the corresponding address with your default browser. Note that , , and buttons become available only when an address is selected from the list.
- References
References tab displays information about database records that refer to this place. If the place is not referenced from any database record, the tab shows empty list. If the place is referenced from many records, the tab will list all of them. This information cannot be modified from the Place Editor dialog. Instead, the corresponding database record (e.g. birth event) has to be brought up and its place reference edited.
4.8.5. Edit Media Data
To edit media data, switch to the Media View and select the desired entry in the list of sources. Double-click on that entry or click on the toolbar to invoke the following Edit Media Properties dialog:

The top of the window shows the dialog title. Below the title is the preview of an object and the summary of its properties (ID, path, and object type). The central part of the window displays four notebook tabs containing different categories of available information. You can bring any tab to the top for viewing or editing by clicking on the appropriate tab heading. The bottom part has and buttons. Clicking at any time will apply all the changes made in all tabs and close the dialog window. Clicking at any time will close the window without applying any changes. If any of the data in any tab was modified, the alert window will appear with the choices of closing the dialog without saving changes, canceling the initial cancel request, or saving the changes.
The tabs provide the following information categories of media object data:
- General
General tab allows to edit the title which labels this object in the database. The title can be typed in the appropriate text entry field. If the object is not local (i.e. the corresponding file does not reside under GRAMPS database directory), the button is available. Click it to copy the media into GRAMPS database directory. This will increase the amount of disk space consumed by GRAMPS database. However, if the external file is deleted or removed, GRAMPS will still be able to use the local copy.
- Attributes
Attributes tab displays information about the attributes of the media object and the controls allowing its modification. The bottom part displays the list of all such attributes stored in the database. The top part shows the details of the currently selected attribute in the list (if any). The buttons , , and allow to correspondingly add, modify, and remove an attribute record from the database. Note that and buttons become available only when an attribute is selected from the list.
- Notes
Notes tab displays information about the notes concerning the media object. These could be any notes which do not naturally fit into the Parameter-Value pairs available to Attributes. To add a note or modify existing notes simply edit the text in the text entry field.
- References
References tab displays information about database records that refer to this media object. If the object is not referenced from any database record, the tab shows empty list. If the object is referenced from many records, the tab will list all of them. The list can be ordered by any of its column headers: Type, Object, or Value. This information cannot be modified from the Media Object Properties Editor dialog. Instead, the corresponding database record (e.g. birth event) has to be brought up and its media object reference edited in the gallery tab.
4.8.6. Edit Events
Events are edited through the following Event Editor dialog:

The top of the window shows the dialog title including the name of the person whose event is being edited. The central part of the window displays four notebook tabs containing different categories of available information. You can bring any tab to the top for viewing or editing by clicking on the appropriate tab heading. The bottom part has and buttons. Clicking at any time will apply all the changes made in all tabs and close the dialog window. Clicking at any time will close the window without applying any changes. If any of the data in any tab was modified, the alert window will appear with the choices of closing the dialog without saving changes, canceling the initial cancel request, or saving the changes.
The tabs provide the following information categories of the event data:
- General
General tab allows editing of the most general information about the event: its type, date, place, cause, and description. The type can be selected from available types listed in the Event type drop-down menu. The rest of the information can be typed in the appropriate text entry fields. Check the Private record box to mark this event record as private. This will give you a chance to omit this event from being included in the reports, if you choose so among the report generation options.
- Sources
Sources tab displays information about sources relevant to this event and the controls allowing its modification. The central part displays the list of all such sources references stored in the database. The buttons , , and allow to correspondingly add, modify, and remove a source reference to this event. Note that and buttons become available only when a source reference is selected from the list.
- Note
Note tab displays any notes concerning the event. To add a note or modify existing notes simply edit the text in the text entry field.
- Witnesses
Witnesses tab displays information about witnesses relevant to this event and the controls allowing its modification. The central part displays the list of all such witnesses stored in the database. The buttons , , and allow to correspondingly add, modify, and remove a witness reference to this event. Note that and buttons become available only when a witness reference is selected from the list.
4.8.7. Edit Source Information
When adding source references to events, places, etc., the following dialog appears:

The top of the window shows the dialog title. The central part displays the source information. The bottom part has and buttons. Clicking at any time will apply all the changes made in all tabs and close the dialog window. Clicking at any time will close the window without applying any changes. If any of the data in any tab was modified, the alert window will appear with the choices of closing the dialog without saving changes, canceling the initial cancel request, or saving the changes.
Note that this dialog does not let you modify sources or create new sources. It only allows you to make a reference to the existing source. To add or modify a source, switch to the Sources View and click or on the toolbar, as appropriate.
The source can be selected from available sources listed in the Title drop-down menu. You can also set the details specific for this particular reference: confidence, volume/file/page. date, text, and comments. Choose the confidence level from the Confidence drop-down menu. The rest of the details can be typed in the appropriate text entry fields.
4.8.8. Edit Alternate Names
Alternate names are edited through the following Alternate Names Editor dialog:

The top of the window shows the dialog title including the name of the person whose alternate name is being edited. The central part of the window displays three notebook tabs containing different categories of available information. You can bring any tab to the top for viewing or editing by clicking on the appropriate tab heading. The bottom part has and buttons. Clicking at any time will apply all the changes made in all tabs and close the dialog window. Clicking at any time will close the window without applying any changes. If any of the data in any tab was modified, the alert window will appear with the choices of closing the dialog without saving changes, canceling the initial cancel request, or saving the changes.
The tabs provide the following information categories of the alternate name data:
- General
General tab allows editing of the most general information about the alternate name: given name, family name, family prefix, suffix, title, and type of the name. The information can be typed in the appropriate text entry fields. The family name and the type can be also selected from available choices listed in the appropriate drop-down menus. Check the Private record box to mark this name record as private. This will give you a chance to omit this name from being included in the reports, if you choose so among the report generation options.
- Sources
Sources tab displays information about sources relevant to this name and the controls allowing its modification. The central part displays the list of all such sources references stored in the database. The buttons , , and allow to correspondingly add, modify, and remove a source reference to this name. Note that and buttons become available only when a source reference is selected from the list.
- Note
Note tab displays any notes concerning the name. To add a note or modify existing notes simply edit the text in the text entry field.
4.8.9. Edit Attributes
Attributes are edited through the following Attribute Editor dialog:

The top of the window shows the dialog title including the name of the person whose attribute is being edited. The central part of the window displays three notebook tabs containing different categories of available information. You can bring any tab to the top for viewing or editing by clicking on the appropriate tab heading. The bottom part has and buttons. Clicking at any time will apply all the changes made in all tabs and close the dialog window. Clicking at any time will close the window without applying any changes. If any of the data in any tab was modified, the alert window will appear with the choices of closing the dialog without saving changes, canceling the initial cancel request, or saving the changes.
The tabs provide the following information categories of the attribute data:
- General
General tab allows editing of the most general information about the attribute: name of the attribute and its value. The information can be typed in the appropriate text entry fields. The attribute name can also be selected from available choices (if any) listed in the Attribute drop-down menu. Check the Private record box to mark this attribute record as private. This will give you a chance to omit this attribute from being included in the reports, if you choose so among the report generation options.
- Sources
Sources tab displays information about sources relevant to this attribute and the controls allowing its modification. The central part displays the list of all such sources references stored in the database. The buttons , , and allow to correspondingly add, modify, and remove a source reference to this attribute . Note that and buttons become available only when a source reference is selected from the list.
- Note
Note tab displays any notes concerning the attribute . To add a note or modify existing notes simply edit the text in the text entry field.
4.8.10. Edit Addresses
Addresses are edited through the following Address Editor dialog:

The top of the window shows the dialog title including the name of the person whose address is being edited. The central part of the window displays three notebook tabs containing different categories of available information. You can bring any tab to the top for viewing or editing by clicking on the appropriate tab heading. The bottom part has and buttons. Clicking at any time will apply all the changes made in all tabs and close the dialog window. Clicking at any time will close the window without applying any changes. If any of the data in any tab was modified, the alert window will appear with the choices of closing the dialog without saving changes, canceling the initial cancel request, or saving the changes.
The tabs provide the following information categories of the address data:
- General
General tab allows editing of the most general information about the address: date, street address, city or county, state or province, country, and the postal code. The information can be typed in the appropriate text entry fields. Check the Private record box to mark this address record as private. This will give you a chance to omit this address from being included in the reports, if you choose so among the report generation options.
- Sources
Sources tab displays information about sources relevant to this address and the controls allowing its modification. The central part displays the list of all such sources references stored in the database. The buttons , , and allow to correspondingly add, modify, and remove a source reference to this address. Note that and buttons become available only when a source reference is selected from the list.
- Note
Note tab displays any notes concerning the address. To add a note or modify existing notes simply edit the text in the text entry field.
5. Settings
To configure GRAMPS, choose ->. The Preferences dialog contains the following sections seen as the corresponding tree elements:
6. About GRAMPS
GRAMPS was written by Donald N. Allingham
(<dallingham@users.sourceforge.net>).
To find more information about GRAMPS, please visit the
GRAMPS Project
Web page.
To report a bug or make a suggestion regarding this application or this manual, follow the directions in this document.
This program is distributed under the terms of the GNU General Public license as published by the Free Software Foundation; either version 2 of the License, or (at your option) any later version. A copy of this license can be found at this link, or in the file COPYING included with the source code of this program.